How to Edge a Raised Paver Patio with Concrete
Edging a raised paver patio with concrete provides both a functional and aesthetic enhancement to your outdoor space. Not only does it define the perimeter of the patio and prevent pavers from shifting or sinking, but it also creates a clean and professional-looking finish. Here's a comprehensive guide on how to edge a raised paver patio with concrete:
Materials You'll Need:
- Quick-setting concrete mix
- Forming boards (2x4 or 2x6 lumber)
- Stakes
- Hammer or mallet
- Level
- Trowel
- Edger or jointer tool
- Bucket
- Water source
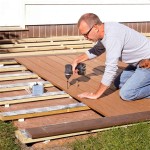
Step 1: Prepare the Base
Before pouring the concrete, ensure the base around the patio is level and compacted. Fill in any low spots with soil or gravel and compact it firmly. The base should extend at least 6 inches beyond the edge of the pavers.
Step 2: Create the Form
Cut the forming boards to the desired height of the concrete edge. Place the boards around the perimeter of the patio, aligning them with the edge of the pavers. Secure the boards in place with stakes driven into the ground on the outside.
Step 3: Mix the Concrete
Follow the manufacturer's instructions to mix the quick-setting concrete in a bucket. The consistency should be thick enough to hold its shape but not so stiff that it's difficult to work with.
Step 4: Pour the Concrete
Fill the form with the concrete mix, using a trowel to level it off and remove any air pockets. Ensure the concrete is packed firmly into the form.
Step 5: Create the Edge
Once the concrete is poured, use an edger or jointer tool to create the desired edge profile. Run the tool along the top of the concrete, pressing down firmly to shape the edge.
Step 6: Finish and Cure
Smooth the top surface of the concrete with a trowel. Let the concrete set for several hours until it becomes firm. Keep the concrete moist during the curing process by covering it with plastic or spraying it with water regularly.
Step 7: Remove the Form
After 24-48 hours, the concrete should have cured sufficiently to remove the forming boards. Carefully remove the stakes and boards, taking care not to damage the concrete edge.
Tips:
- Use a concrete colorant or stain to match the color of the pavers or add a decorative touch.
- Consider installing an expansion joint between the concrete edge and the patio pavers to accommodate seasonal movement.
- Protect the concrete edge from moisture and weathering by applying a sealant after it has fully cured.

Paver Edge Restraint Why I Use Concrete

5 Ways To Retain A Paver Edge In Landscaping Western Interlock

How To Build A Raised Paver Patio Western Interlock

Proper Paver Edging Installation For A Long Lasting Patio

Concrete Paver Walkway Edge Ideas For Your Home Bayside Pavers

How To Build A Paver Patio Young House Love

Paver Edging Options Borders Non Steps Restraints More

Installing Concrete Curbing Vs Bond Beam For Pavers What S Design The Difference

How To Build A Raised Patio With Retaining Wall Blocks Brick Paver Pavers Design

How To Build A Raised Patio
See Also