How To Build A Patio Floor: A Comprehensive Guide
Constructing a patio floor can significantly enhance the usability and aesthetic appeal of outdoor living spaces. A well-built patio provides a designated area for relaxation, entertainment, and dining. While the undertaking requires planning, effort, and adherence to best practices, the resulting patio floor represents a valuable investment in property value and quality of life. This guide provides a step-by-step approach to building a patio floor, covering essential considerations from initial planning to the final finishing touches.
Planning and Preparation: Laying the Groundwork for Success
The initial phase of patio construction is critical and involves careful planning and preparation. This stage determines the overall success of the project, influencing factors such as aesthetics, functionality, and longevity. Neglecting this stage can lead to costly mistakes and structural issues later on.
First, determine the desired size and location of the patio. Consider the intended use of the space, the surrounding landscape, and any relevant building codes or homeowner association regulations. Accurately measuring the area will dictate the amount of materials required, reducing waste and minimizing unforeseen expenses. The location should ideally be relatively level and well-drained to prevent water accumulation, which can lead to damage over time.
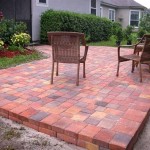
Next, choose the appropriate patio material. Common options include pavers, concrete, brick, flagstone, and gravel. Each material possesses distinct characteristics in terms of cost, durability, aesthetics, and installation complexity. Pavers, for example, are available in a variety of shapes, colors, and textures, offering design flexibility. Concrete provides a durable and versatile surface that can be stamped, stained, or textured to achieve a desired look. Brick offers a classic and timeless aesthetic, while flagstone provides a natural and rustic appearance. Gravel is a more cost-effective option suitable for informal settings.
After selecting the material, create a detailed plan that outlines the patio's dimensions, layout, and any special features such as borders, patterns, or built-in seating. A well-defined plan will serve as a roadmap throughout the construction process, ensuring accuracy and consistency. This plan should also incorporate considerations for drainage, such as a slight slope away from the house to prevent water from pooling. A slope of approximately 1/4 inch per foot is generally recommended.
Finally, gather the necessary tools and materials. Essential tools include a shovel, rake, wheelbarrow, tamper, level, measuring tape, string line, safety glasses, and work gloves. Material requirements will vary depending on the chosen material, but typically include base material (gravel or crushed stone), leveling sand, patio material, and edge restraints. Ordering slightly more material than initially calculated can account for cuts and waste.
Excavation and Base Preparation: Ensuring a Stable Foundation
Once the planning phase is complete, the next step involves excavation and base preparation. This step is crucial for creating a stable and level foundation for the patio floor, preventing settling, shifting, and cracking over time. A properly prepared base will also facilitate drainage and reduce the risk of weed growth.
First, excavate the area to a depth that accommodates the base material, leveling sand, and patio material. The exact depth will depend on the thickness of each layer. As a general guideline, excavate to a depth of at least 6-8 inches. Remove any vegetation, topsoil, and debris from the excavated area. Ensure that the excavation extends slightly beyond the planned perimeter of the patio to accommodate edge restraints.
Next, install edge restraints along the perimeter of the excavated area. Edge restraints prevent the patio material from shifting and spreading over time. Common options include plastic, metal, or concrete edging. Secure the edge restraints in place using stakes or spikes, ensuring that they are level and flush with the surrounding ground. The edge restraints must be strong enough to withstand lateral pressure from the patio material and the surrounding soil.
After installing the edge restraints, add the base material. The base material typically consists of gravel or crushed stone, which provides a stable and well-draining foundation. Spread the base material evenly across the excavated area and compact it thoroughly using a tamper. Compacting the base material is crucial for preventing settling and ensuring a solid foundation. Add additional layers of base material if necessary to achieve the desired depth and compaction.
Finally, add a layer of leveling sand over the compacted base material. Leveling sand provides a smooth and even surface for installing the patio material. Spread the leveling sand evenly across the base material and screed it to create a level surface. A screed is a long, straight board used to level the sand by dragging it across the surface. Use a level to check the surface for any high or low spots and adjust the sand accordingly. The sand layer should be approximately 1-2 inches thick.
Material Installation and Finishing: Crafting the Patio Surface
With the base properly prepared, the final step involves installing the patio material and applying the finishing touches. This step determines the aesthetic appeal and overall functionality of the patio floor. Careful attention to detail is essential to ensure a professional-looking and durable result.
Begin installing the patio material according to the chosen pattern and design. If using pavers or bricks, start at one corner of the patio and work outward, carefully aligning each piece. Use a rubber mallet to gently tap the pavers or bricks into place, ensuring that they are level and flush with the surrounding pieces. Use spacers to maintain consistent joint widths between the pavers or bricks. Adjustments may be necessary based on the plan and the size and shape of the chosen material. Remember to keep the desired slope in mind when placing each paver.
If using flagstone, select and arrange the stones to create a visually appealing and cohesive design. Flagstone typically has irregular shapes and sizes, requiring more careful planning and placement. Consider the overall pattern and flow of the stones, aiming for a balanced and natural look. Fill the gaps between the flagstones with gravel, sand, or mortar, depending on the desired aesthetic. Mortar joints will provide a more durable and permanent surface, while gravel or sand joints will allow for better drainage.
After installing the patio material, fill the joints with joint sand. Joint sand helps to stabilize the patio material and prevent weed growth. Sweep the joint sand across the surface of the patio, filling all the gaps and crevices. Use a broom or brush to remove any excess sand from the surface of the patio. Water the patio lightly to help settle the joint sand and further stabilize the patio material. More than one application of joint sand may be needed.
Finally, apply a sealant to the patio surface to protect it from the elements and enhance its appearance. Sealants can help to prevent staining, fading, and cracking. Choose a sealant that is appropriate for the chosen patio material and follow the manufacturer's instructions carefully. Apply the sealant evenly across the surface of the patio using a brush, roller, or sprayer. Allow the sealant to dry completely before using the patio. Regular cleaning and maintenance will help to prolong the life of the patio and keep it looking its best.

How To Build A Backyard Paver Patio All By Yourself

13 Great Diy Outdoor Patio Flooring Ideas On A Budget The Garden Glove

How To Build A Patio In Weekend Fine Gardening

How To Build A Diy Patio For Under 120 Outdoor Spaces

How To Build A Ground Level Deck

How To Build A Paver Patio Young House Love

How To Build A Platform Deck Diy Family Handyman

13 Great Diy Outdoor Patio Flooring Ideas On A Budget The Garden Glove

How To Build A Ground Level Deck Decks Com

How To Build A Simple Diy Deck On Budget The Home
See Also