How to Build Wood Patio Floor Plans
Building a wood patio enhances outdoor living space and adds value to a property. Careful planning and execution are crucial for a successful project. This article provides a step-by-step guide to developing wood patio floor plans and preparing for construction.
Initial Planning and Site Assessment: Begin by defining the patio's purpose. Will it be used for dining, lounging, or both? Consider the size and shape that best accommodates these activities and complements the existing house and landscape. Accurate site measurements are essential. Note the location of trees, shrubs, utilities, and any existing structures that might impact the patio's placement and dimensions.
Material Selection: Pressure-treated lumber is a cost-effective and durable option for patio framing. Popular decking materials include redwood, cedar, and composite lumber. Each material offers distinct advantages in terms of aesthetics, durability, and maintenance requirements. Research the different options and choose materials appropriate for the climate and intended use.
Design and Layout: Sketching the patio's outline helps visualize the final product. Specify the dimensions and placement of support beams, joists, and decking boards. Consider incorporating features like steps, railings, or built-in seating. Ensure adequate spacing between decking boards for drainage and ventilation. Properly designed plans minimize material waste and facilitate accurate construction.
Building Permits and Regulations: Consult local building codes and obtain the necessary permits before starting construction. Regulations may dictate specific requirements for setbacks, height restrictions, and structural integrity. Adhering to these regulations ensures safety and prevents potential legal issues.
Foundation Preparation: A stable foundation is critical for a long-lasting patio. Clear the designated area of vegetation and debris. Level the ground and compact the soil to prevent settling. The type of foundation depends on the patio's size and the soil conditions. Options include concrete slabs, concrete footings, or gravel bases. For larger patios or areas with unstable soil, consulting a structural engineer is recommended.
Framing Construction: Begin by constructing the outer frame using pressure-treated lumber. Ensure the frame is square and level. Install support beams and joists according to the floor plan, maintaining consistent spacing. Use galvanized hardware and appropriate fasteners for durability and resistance to corrosion. Double-check measurements and alignment throughout the framing process.
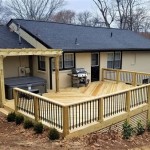
Decking Installation: Attach the decking boards to the joists using corrosion-resistant screws or nails. Maintain consistent spacing between boards to allow for expansion and contraction due to temperature changes. Pre-drilling holes prevents splitting, especially in denser wood species. Consider the desired pattern for laying the decking boards, such as straight, diagonal, or herringbone.
Finishing Touches: Once the decking is installed, trim any overhanging boards and sand down any rough edges. Apply a sealant or stain to protect the wood from moisture, UV rays, and insects. Choose a finish that complements the surrounding landscape and personal preferences. Regular maintenance, such as cleaning and re-applying sealant, will extend the life of the patio.
Drainage Considerations: Proper drainage prevents water accumulation and protects the patio's structural integrity. Ensure the patio slopes slightly away from the house to facilitate water runoff. Consider installing drainage features, such as French drains or dry wells, to manage excess water, particularly in areas with heavy rainfall.
Safety Precautions: Throughout the construction process, prioritize safety. Wear appropriate safety gear, including gloves, eye protection, and hearing protection. Use power tools cautiously and follow manufacturer instructions. Secure the work area and keep children and pets away during construction.
Accessibility Considerations: If the patio will be accessed by individuals with mobility limitations, incorporate accessibility features into the design. This may include ramps, wider doorways, and handrails. Consult accessibility guidelines and regulations to ensure compliance and create a safe and inclusive outdoor space.
Budgeting and Cost Estimation: Develop a detailed budget that includes the cost of materials, permits, tools, and any professional services required. Obtain quotes from multiple suppliers to compare prices. Factor in potential cost overruns and contingencies. Careful budgeting helps manage expenses and ensures the project remains within financial constraints.
Project Timeline: Establish a realistic timeline for completing the project, considering the scope of work, available time, and potential weather delays. Breaking down the project into smaller, manageable tasks facilitates progress tracking and helps maintain momentum.

Building A Ground Level Deck Part 1

Outdoor Floor Plans 2d And 3d Cedreo

Diy Guide To Building Your Own Deck

How To Build An 8 X 16 Wood Deck Or Floor For Outdoor Pig Pen

How To Build A Floating Deck House By The Bay Design

How To Build A Floating Deck Rogue Engineer

Building An Easy No Cut New Deck For A Plug And Play Hot Tub Part 2 Funky Junk Interiors

How To Plan For Building A Deck Step By Guide

How To Build A Floating Deck House By The Bay Design

How To Build Round Or Octagon Wood Framed Deck Building Education For Pro S
See Also