Laying a Patio on Sloping Ground: A Comprehensive Guide
Enhancing your outdoor space with a patio on sloping ground can be a rewarding endeavor, but it requires careful planning and execution. Here's a comprehensive guide to help you create a stable and aesthetically pleasing patio on a slope.
1. Site Preparation
Begin by clearing the area of vegetation, debris, and any existing structures. Grade the slope by digging out a shallow trench along the top of the slope, creating a level surface for the patio base. Install a retaining wall along the lower edge of the slope to support the patio and prevent soil erosion.
2. Base Material
Compact a layer of crushed stone or gravel over the graded area, serving as the base for the patio. Choose a material that drains well and provides stability. Spread the base material evenly and compact it firmly using a plate compactor.
3. Slope Adjustment
To ensure water drainage, the patio should slope away from any structures or lower areas. Determine the desired slope by measuring the height difference between the top and bottom of the patio and dividing it by the length. Adjust the base material accordingly by adding or removing layers to achieve the proper slope.
4. Pavers or Tiles
Select pavers or tiles that are suitable for outdoor use and durable enough to withstand the weight of furniture and foot traffic. Consider the texture, color, and size of the pavers to complement your outdoor décor and the surrounding landscape.
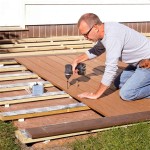
5. Laying the Pavers
Start laying the pavers from the lowest point and work your way up. Use a level to ensure that each paver is flat and aligned with its neighbors. Spread a layer of sand over the base material and tamp it down to create a stable surface for the pavers. Carefully set the pavers onto the sand and tap them into place using a rubber mallet.
6. Jointing Sand
Once the pavers are laid, fill the joints between them with jointing sand. This sand will help lock the pavers in place and prevent weeds from growing through. Apply the sand liberally and sweep it into the joints, then tamp it down to compact it.
7. Sealing the Patio (Optional)
To enhance the durability and appearance of your patio, consider sealing it with a penetrating sealant. This will help protect the pavers from stains, moisture, and UV damage. Allow the sealant to dry completely before using the patio.
Tips:
- Use a spirit level to ensure the patio base and pavers are level.
- Create a slightly steeper slope on the outer edges of the patio for better drainage.
- Install drainage holes or a French drain to prevent water from pooling.
- Anchor the retaining wall using stakes or concrete footings.
- Use a patio edging product to define the perimeter of the patio and prevent soil erosion.

Paver Patio Slope Diy Pavers Building A

How To Build A Raised Patio

How To Cope With A Sloping Garden Alda Landscapes

How Much Should A Patio Slope Away From House

Dry Laying Slabs On Gravel Or Sand Instruction Kronos Ceramiche Floor Coverings In Porcelain Stoneware

How To Cope With A Sloping Garden Alda Landscapes

Dry Laying Slabs On Gravel Or Sand Instruction Kronos Ceramiche Floor Coverings In Porcelain Stoneware

Part 1 How To Build A Paver Patio On Slope And Prevent Soil Erosion

Can You Build A Patio On Sloped Yard Lawn Landscape

How To Make A Sloped Lawn Into Tiers The Step By Guide
See Also