How to Put Straps on Patio Chairs: A Step-by-Step Guide to Refresh Your Outdoor Seating
Transform your patio into a stylish oasis by updating your chairs with fresh, supportive straps. Whether you're replacing worn-out straps or adding a touch of color to your outdoor space, this comprehensive guide will empower you to tackle this task with ease. Follow these step-by-step instructions for a comfortable and durable seating experience.
Step 1: Gather the Necessary Materials
To ensure a smooth installation process, equip yourself with the following tools and materials:
- New patio chair straps
- Measuring tape or ruler
- Drill or screwdriver
- Drill bits (optional)
- Screws or bolts
- Anti-corrosive lubricant (optional)
- Socket wrench or wrench set
Step 2: Measure and Cut the Straps
Determine the required length of the straps by measuring the distance between the attachment points on the chair frame. Add a few inches for overlap and adjust accordingly to achieve the desired tension. Mark the cutting points accurately on the straps and use a sharp knife or scissors to make clean cuts.
Step 3: Prepare the Holes
Locate the existing holes in the chair frame and inspect them for any damage or obstructions. If necessary, use a drill bit to widen the holes slightly to accommodate the screws or bolts you'll be using. For added durability, apply an anti-corrosive lubricant to the holes and screws.
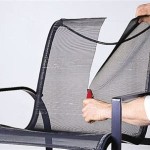
Step 4: Install the Straps
Begin installing the straps by threading them through the holes on one side of the frame. Ensure that they are evenly spaced and aligned with the corresponding holes on the opposite side. Hold the straps in place and insert the screws or bolts through the holes. Tighten the fasteners securely using a drill, screwdriver, socket wrench, or wrench.
Step 5: Repeat on the Other Side
Repeat the strap installation process on the opposite side of the chair frame. Maintain even spacing and alignment to ensure proper support and balance. Tighten the screws or bolts to the same level as on the first side.
Step 6: Check Tension and Adjust
Once the straps are installed, sit on the chair to test the tension. If necessary, loosen or tighten the straps by adjusting the screws or bolts accordingly. Aim for a balance between comfort and support, ensuring that the straps provide adequate support without being overly taut.
Step 7: Enjoy Your Refreshed Patio Chair
Congratulations! You have successfully installed the straps on your patio chairs. Relax and enjoy the upgraded look and enhanced comfort of your refreshed outdoor seating. The new straps will not only elevate the style of your patio but also provide long-lasting support for years to come. By following these steps, you can maintain and refresh your patio furniture with ease, transforming your outdoor space into a haven of comfort and style.

How To Install A Double Wrap Vinyl Strap

Double Wrap Vinyl Strap Installation

Outdoor Furniture Repair How To Fix A Vinyl Strap On Lounge Chair Sunniland Patio In Boca Raton

Double Wrap Vinyl Strap Installation

How To Save Yourself Money With Diy Patio Chair Repair

How To Install A Double Wrap Vinyl Strap

Tips For Using Your Outdoor Furniture Cover The Blog

How To Replace Single Wrap Vinyl Straps 13 Steps With S

Double Wrap Vinyl Strap Installation

How To Save Yourself Money With Diy Patio Chair Repair
See Also