Patio Chair Sling Replacement Service Manual
Maintaining the comfort and aesthetics of your outdoor seating is crucial for enjoying your patio area. Replacing patio chair slings is a common task that homeowners often undertake to revitalize their furniture and improve their outdoor experience. This comprehensive service manual provides a step-by-step guide to assist you in executing this project successfully. Follow these instructions carefully to ensure a professional-quality outcome that will extend the longevity of your patio chairs.
Materials Required:
Before commencing the replacement process, gather the necessary materials, including:
- New patio chair sling
- Cordless drill or screwdriver
- Drill bits (sizes vary depending on sling attachment method)
- Measuring tape or ruler
- Scissors or utility knife
- Optional: thread locker (recommended for screws)
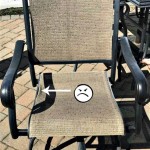
Step 1: Remove the Old Sling
Begin by removing the old sling from the chair frame. Depending on the attachment method, this may involve unscrewing bolts, removing pins, or detaching clips. Carefully detach the sling from all points of attachment, ensuring that all hardware is removed.
Step 2: Prepare the New Sling
Lay out the new sling on a flat surface. Measure and mark the center of the sling and the center of the chair frame. Align these marks to ensure the sling is evenly positioned.
Step 3: Attach the Sling
Bolt Attachment: If the chair uses bolts, insert a bolt through the hole on the sling and frame. Secure the bolt tightly with a nut and washer.
Pin Attachment: Insert a pin through the holes on the sling and into the holes on the frame. Secure the pin in place with a cotter pin.
Clip Attachment: Align the clips on the sling with the holes on the frame. Snap the clips into place, ensuring they are securely fastened.
Step 4: Tension the Sling
Once the sling is attached, it is essential to tension it properly. Pull the sling taut and secure it by tightening the bolts, pins, or clips further. Ensure that the sling is tight enough to provide adequate support but not so tight that it creates wrinkles or damage.
Step 5: Install Hardware
For bolt attachments, apply thread locker to the bolts before inserting them. This additional measure helps prevent the bolts from loosening over time. Tighten the bolts securely using a cordless drill or screwdriver.
Step 6: Inspect and Finish
Inspect the sling to ensure it is securely attached and properly tensioned. Remove any excess material or trim the edges of the sling if necessary. Use a damp cloth to clean the chair frame and any visible hardware.
Tips for Success:
Select a sling made from durable and weather-resistant materials.
Ensure the new sling is compatible with your chair frame.
Measure carefully to ensure the sling is properly centered and fits snugly.
Tighten the bolts, pins, or clips gradually and evenly to avoid damaging the sling.
Use a thread locker on bolts to enhance durability.
Inspect the sling regularly and make any necessary adjustments to maintain its tension.

How To Replace Two Piece Sling Chair Fabric

How To Replace Outdoor Sling Chair Fabric With Phifertex

Samsonite Patio Furniture Replacement Slings

How To Replace Fabric On A Patio Sling Chair

How To Replace Fabric On A Sling Chair Ofs Maker S Mill

Tropitone Sling Chair Replacement S Furniture

Replacement Slings For Your Patio Chairs All American Pool And Blogall Blog

How To Replace Fabric On A Patio Sling Chair
.png?strip=all "How To Replace Your Pool Furniture S Sling A Step By Guide Supply")
How To Replace Your Pool Furniture S Sling A Step By Guide Supply

Diy Replacement Slings For Patio Chairs Absolute Furniture
See Also